In my previous Torqeedo install article I left off that there was some small issues with the performance due to the limit of the manufacturers motor shaft length.  In the install manual it states the boom shaft that attaches to the ball on the kayak is to be completely level. Well this is found to be false. Pitching the boom down towards the water is the fix.

A support brace was custom made by a certified Torqeedo installer which mounts from the factory rudder mount threaded insert location. custom mount2 opaic
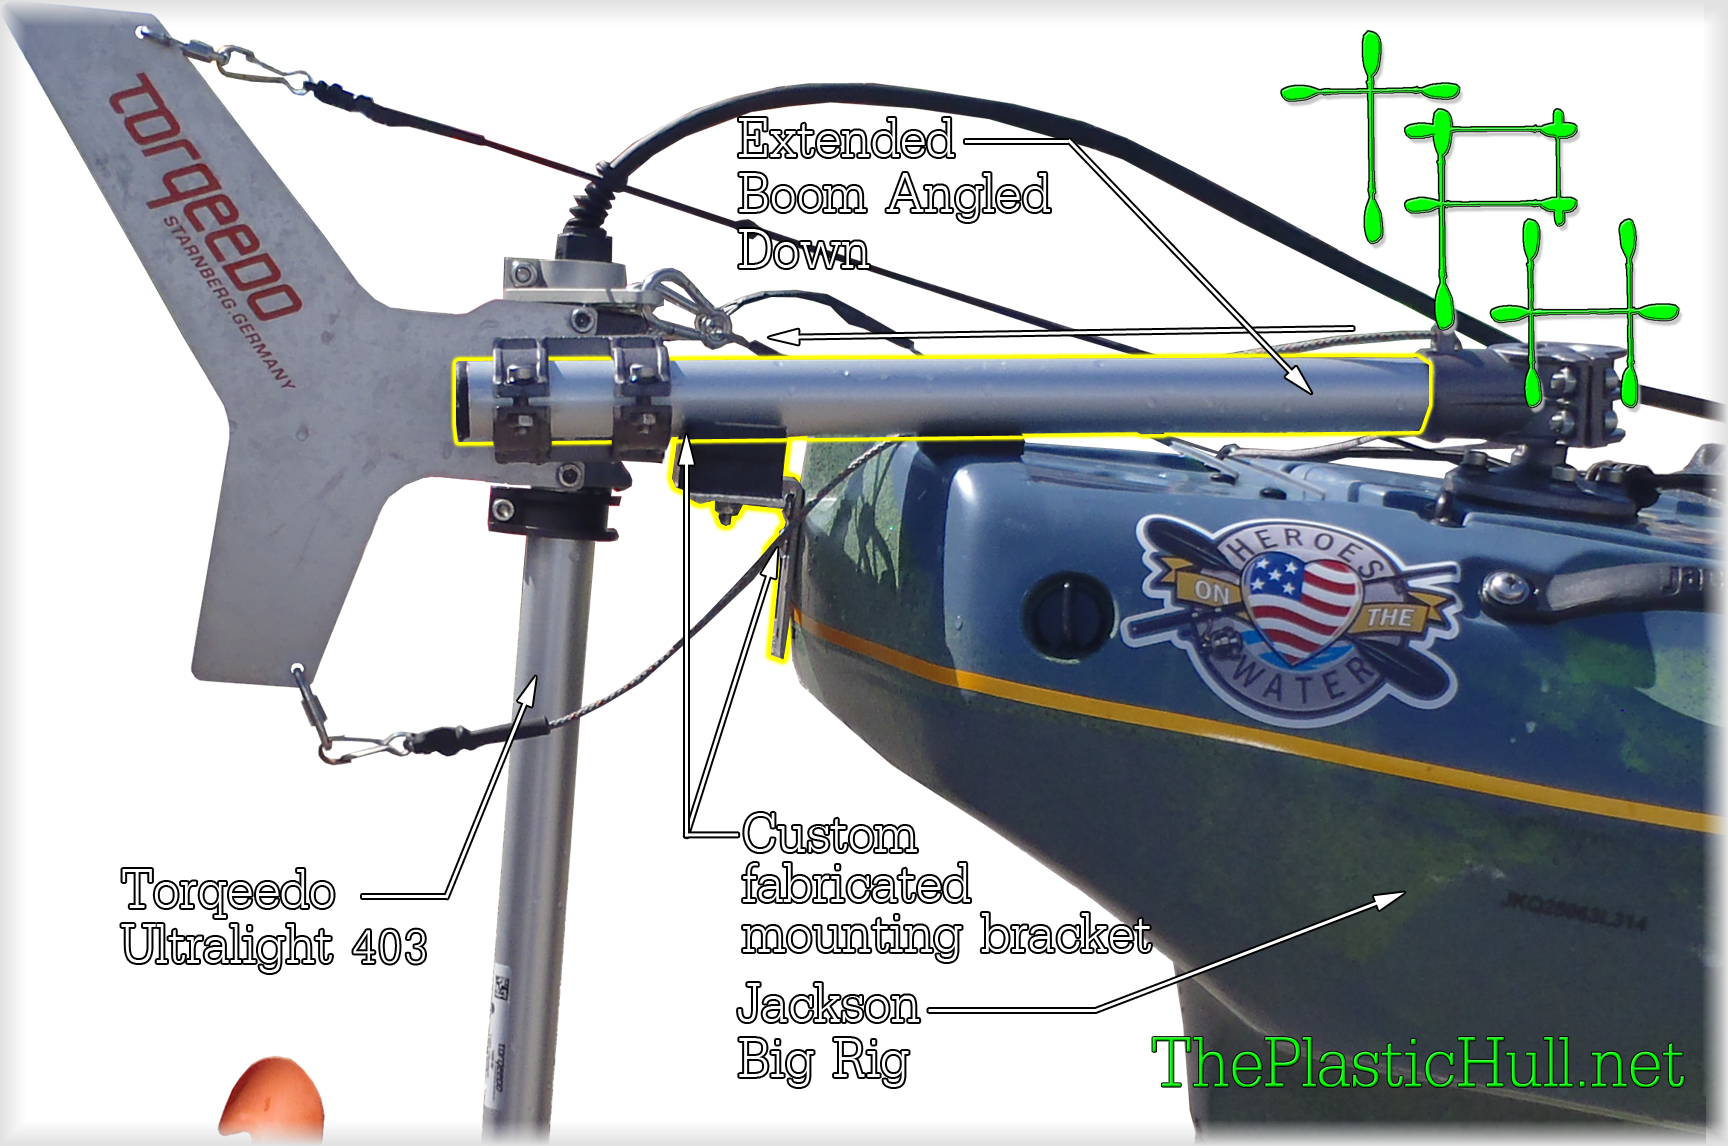
On the stern of the Big Rig you will notice the two brass threaded inserts molded into the hull. The rubber brace was removed from the kayak position and mounted to the custom bracket to brace the boom closer to the motor and allow the pitch.

The longer shaft allows the motor to use the small pitch and gain about 4 inches deeper into the water which was necessary to fix the cavitation issue. The gain on speed is minimal from the testing i have done but has not been tested in the control venue at Round Valley Res where the first test was initiated.

Lessons learned. If I was to  install this motor on another Jackson Big Rig I would mount the ball on the flat area about 6″ towards the stern. This would have allowed me to angle the boom down more. For me this was the first time following the installation book was wrong. The setup however did work just not well enough for my liking.

The Torqeedo motor system on the Big Rig is awesome! I do recommend it highly. This was my fix. Hopefully your install will be smoother by following my posts on The Plastic Hull.net.


Good Luck!


Disclaimer:

Installing hardware may cause damage and/or void manufacturer warranties.  ThePlasticHull.net its authors or any other source of information on this website is in no way responsible for your actions nor any type issues or damage that may occur.  The information provided on this website is a free reference guide only. The authors of all information, sponsors and the owners of the website that host this information are not liable for any problems or issues that arise from the use of this information. Users of this information hereby acknowledge that all use of this information is done by their own free will, at their own sole risk, understanding that destruction of property, injury, or death could occur.

Other Torqeedo Posts:

403 ultralight

403 ultralight post freature2


This is not a kit install but a custom anchor trolley.   I wanted it to be unique.

Parts copy (Large)Things you will need

  • 2 Pulleys Stainless Steel
  • 1/8″ bungee – Color of choice
  • at least 30 feet of reflective 5/32″ poly rope
  • 2 Deck Loops
  • 4 Nuts bolts and rubber washers.
  • 2″ Nylon Ring

(Below Not Photoed)

  • Galvanized Hog Rings
  • Heat Shrink Tubing

Tools

  • Drill
  • Torch or Bic Lighter
  • Pocket Knife
  • Philips screw Driver
  • 3/8″ Socket
  • 1/4″ Drive Socket Wrench
  • Pliers

What is an Anchor Trolley and why is it needed?

Access the bow or stern is basically impossible unless you were to get off the kayak and swim there. Simply using a block and loop conveyor system aka Anchor Trolley. An anchor trolley is basically a clothing line that is used to shift the point of your anchoring from cockpit to both bow and stern. An anchor trolley can be installed on either side of the kayak or both. Its all about how you the angler would prefer to use the system.

Now to install your anchor trolley. First you will cut (2) 8″ lengths of the 1/8″ bungee. Use the Torch or Bic lighter to fuse the Nylon sheath around the rubber bungee chords. This will ensure the bungee will not fall apart.

Now you will insert each bungee into the eye of the block and tie both ends together with a knot.blocks_installedl (Large)

Once this is done its time to locate the Pad Eyes or the attachment location to the kayak. Approx 12″ from tip of bow and stern. Drill the upper hole first and thread the bolt in to hold the pad eye in place. Angle the pad eye away from the bow on a 45 degree angle but make sure it is flat to the boat. Drill the second hole and thread in. Using the washer with the rubber on the inside make sure that faces the inside of the hull. Snug the nut down tight enough where its not going to move. Repeat the same for the stern. Once the pad eyes are installed connect the blocks to each one.

Using the poly reflective rope and run it through the bow block first bottom to top and back to the stern block top to bottom. With the tag end of the rope slide on a piece of heat shrink tubing then loop it through the Nylon ring leaving about 3″ excess crimp two Hog Rings as close to the nylon ring as possible around the tag end and the main line of the poly rope making the loop permanent around the nylon ring. Cut the tag end of the rope back 1/2″ before the Hog Ring. You will now slide the heat shrink tubing over the tag end and the hog rings. Using a heat gun shrink the tubing but take caution not to burn the poly rope nylon ring or heat shrink.

ring and tie (Large)

now pull rope from spool end to the nylon ring and add 12″ and cut. Burn end of the rope and run the new tag end through the ring. Snug up the trolley and using 5 half hitches tie the line. Using half hitches will make the trolley adjustable in the future as the rope gets wet it may stretch. Simply un-tie and re-tie snug again.

You have now successfully installed an anchor trolley on your Jackson Cuda 14!

Disclaimer:

Installing hardware may cause damage and/or void manufacturer warranties.  ThePlasticHull.net its authors or any other source of information on this website is in no way responsible for your actions nor any type issues or damage that may occur.  The information provided on this website is a free reference guide only. The authors of all information, sponsors and the owners of the website that host this information are not liable for any problems or issues that arise from the use of this information. Users of this information hereby acknowledge that all use of this information is done by their own free will, at their own sole risk, understanding that destruction of property, injury, or death could occur.

IMG_1428 IMG_1429Water, salt, dirt, and corrosion are the worst components for damaging your cable connectors.

Unlike a motor boat where the cable connectors are typically protected from most of the harsh weather conditions kayaks are completely exposed. Were out there taking waves over our bows landing on sandy beaches and constantly getting rained on.

For a small cost you can protect your cable connectors to obtain the maximum lifespan out of these expensive cables.

The  solution is simple.  Dielectric Grease and Caps that are designed to protect the IMG_1425patruding end of  a nut and bolt.

IMG_1426The result is a water tight protected Cable plug. To should still be careful  takes it from getting sand or other debris. The grease it will stick and make  a pretty big mess.

IMG_1393

You can find these screw protectors at your local hardware store. They come in different sizes so measure the cable end you would like to protect prior to purchasing them.

I put the dielectric grease on the female plug then place the cap over it. This added protection should prevent corrosion and extend the life of your electronics cables.


Page 9 of 12« First...7891011...Last »
%d bloggers like this: