If you have owned a sit inside or hybrid kayak you understand how hard it is to drain water out of it. Especially when its on the roof of your truck full from the rain or out on open water taking waves over the bow. An electric bilge pump is a inexpensive answer to the problem. This article focuses on installing an electric kayak bilge pump inside a Jackson Kilroy LT but can be modified to work with any sit inside style kayak.
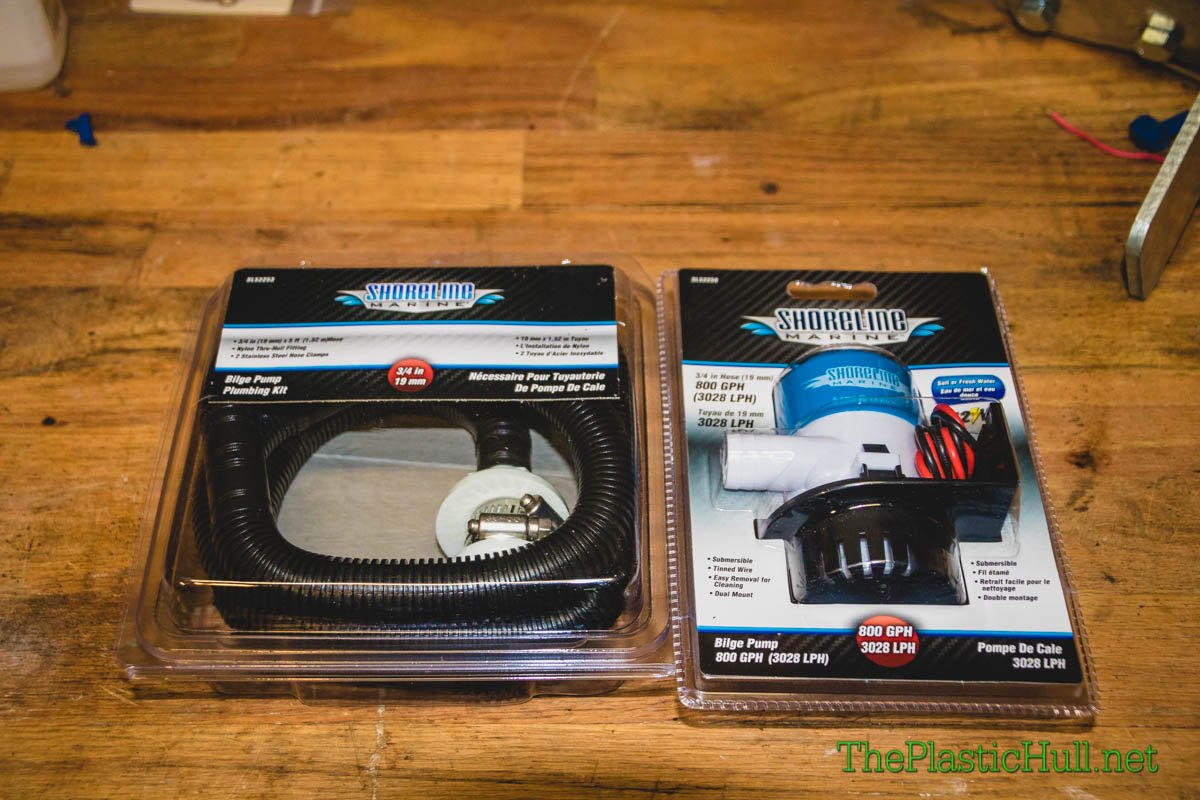
Pump & Hose w/ fitting kit


Materials:

Tools:


Install:

One of the simpler install on the Kilroy the electric bilge pump should only take 15 minutes to install. The bilge pump location I chose is in front of the stern bulkhead.  This location is idea because tilting the kayak bow up the water will collect here. Being one of the flattest accessible areas will allow the most water to be pumped from the inside deck.

Kayak Electric Bilge Pump - Attach pump housing to kayak bulkhead


Remove the strainer from the bottom of the pump. Using the silicone spread it on the flat mounting area of the bracket. Firmly press against the hull push it so it adheres to the bulkhead wall. Let dry overnight.

1" Hole DrilledClip pump into housing bracket. Connect tube to outlet of pump. Choose a location for the 3/4″ Thru-Hull fitting. Make sure the location is above where the waterline of the kayak fully loaded would be. It is important the mounting area should be flat but angle away from the kayak. Mark the desired location and drill a 1″ hole.


Measure the distance to your chosen exit location. With a razor blade cut the tubing leaving some slack. Connect the end to the Thru-Hull fitting and tighten down hose clamps snug.

Wiring Electric Bilge Pump:

Using 2 butt connectors each splice and a 3″ piece of 1/2″ adhesive heat shrink tubing connect the 5′ length of 2 stranded wire to the 12v disconnect. Connect black to black and red to red. Crimp on the butt connectors with a heat gun shrink the ends to the wire. Do the same for the pump leads on the other end of the disconnect and the 12V power plug. Add a dab of Dielectric Grease to each connection on the disconnect plug to fight corrosion and keep it maintained for easy removal. Once the wiring is completed you will mount the disconnect and wires out of the way. This is the storage area of the Kilroy. The less things to snag on is best. I used Cable Tie Mounts and wire ties to hang the wire up under the cockpit lip out of the way.

Bilge Pump Connected to Battery Box in Cockpit of KayakBattery Connection:

My battery box is set up with a 12V cigarette lighter plug. It is your preference whichever type of connector you would like to connect to the battery! I’m going to see how this works out for now. Maybe add separate switch on the battery box to control the on/off of the cigarette lighter receptacle.


Disclaimer:
Installing hardware may cause damage and/or void manufacturer warranties.  ThePlasticHull.net its authors or any other source of information on this website is in no way responsible for your actions nor any type issues or damage that may occur.  The information provided on this website is a free reference guide only. The authors of all information, sponsors and the owners of the website that host this information are not liable for any problems or issues that arise from the use of this information. Users of this information hereby acknowledge that all use of this information is done by their own free will, at their own sole risk, understanding that destruction of property, injury, or death could occur.

Keeping it clear!

Bringing your new fishing kayak home is always an exciting time. Many new owners purchase accessories to add to their kayak immediately. So why paddle prior to rigging your new fishing kayak? Fishing from a small platform it is very important to place everything you will use in reach but not to interfere with other things. The main function of the kayak is the paddling stroke for propulsion. There is an area of the kayak that you will stroke and sweep. Any obstructions within the path pf the paddle will limit your paddle stroke and hence limit your speed and range of motion. Understanding the range of your stroke and sweep is very important for rod holder, camera mount, and fish finder mounting locations.

Paddle Interfearence Graphic

Learn how to properly paddle:

There are many resources online that can teach you a solid paddling technique. Along with the paddle strokes necessary for propelling your fishing kayak. Youtube is a great place to start. Everything is on there. A great website for learning how to paddle is www.paddling.com. Its in the website address! Although geared towards touring and sea kayaking there is plenty education us kayak anglers can benefit from there. Also if you have the time please do take an ACA accredited paddling course.

Fallen and cant get back on:

Remember kayaking is a dangerous sport. Being afloat on a very small narrow boat there is always a risk of capsizing. This is a great time to feel out your new fishing kayak. Lean on it feel where it may capsize. Then once you find that point practice a self rescue. Its great to do this with no rigging and gear for the first time. Practice is always good and can also give you an idea of where you may not want to mount an accessory due to it being in the way when trying to climb back onto your kayak. Also remember its smart to always wear your Personal Flotation Device (PFD).

Reaching can be dangerous:

Equally important as obstructions is learning and knowing your reach limitations. The hardest location to reach to is behind you. In most cases reaching behind you can make you become unstable due to the natural tendency to lean. A ground rule to remember is where your head goes the kayak follows. Its good to know your reach for control of the fish finder and the ability to grab rods from the rod holders quickly. Also many anglers use a milk crate system behind them for tackle storage as this is the original way of stowing gear it is not needed anymore due to the development of fishing style kayaks and their ample storage. Reach behind you and try different configurations.

Learning The Seat:

Some later fishing kayak models enable the ability to adjust the seat forward and aft. Remember, if you are going to be trimming out the kayak it will adjust the location of your paddle stroke and sweep. It is good not to install accessory’s that may impede this area. Gear Track mounting comes into play here as the accessory is now able to be re-positioned easily. Keep in mind that if your kayak has a high/low position seat this will change your paddle stroke. Its good to paddle from every position possible.

Track Mounting:

Track mounting has basically become an essential need for mounting accessories to your kayak. Enabling the ability to mount many different accessories for different locations, fishing types, and even kayak uses. Think if a track light. Gear tracks work the same way with the accessory having a T bolt on the end can be tightened down on any portion of the track.

Anchor Trolley:

An anchor trolley system operates like a clothes line. Utilizing 2 pulleys and a ring the system allows you to move your anchoring point from the seating position. The anchor can now be positioned to the bow or stern of the kayak. Paddling and fishing from your new kayak is important prior to installing an anchor trolley.  Dince most likely you will be drilling and thru-bolting its a great to get an idea which side you would like to anchor from. Personally my anchor trolleys are installed on the right side of the boat. Being right handed and fishing conventional gear mostly I tend to retrieve my rod pointing towards my left side.

Industry Accomplishments:

Many leading fishing kayak manufacturers are now designing boats with integrated recessed track systems. This creates the ability to trade out accessories and relocate them on the fly. However if you own a kayak or want to purchase one that does not have factory tracks you can always add them aftermarket. YakAttack a leading industry kayak fishing accessory company has a few different track system options available. They also offer a wide range of accessories that mount to the track system.

Molded inserts have become standard. Jackson Kayak started molding in brass threaded inserts in 2014 in accordance for mounting a GoPro mount and a Ram Mounts screw ball. These set points are great locations for just about any accessory you can think of. Also the locations being well thought out typically will not interfere with your paddle stroke.

Summary:

Please remember first paddle before installing accessories or you may find everything you just bolted drilled screwed and mounted to your kayak is out of reach or in the way.


Last year I reran all of my kayak steering cables on the Big Rig for the Torqeedo. Instead of swaging the cable termination at the foot brace I used a 3/16″ wire rope clamp. The original clamps made it through the season, but galvanized steel had rusted and corroded in no time.

The reason for this upgrade was to grant the ability of leaving the steering cables fully adjustable and removable for maintenance. A wire rope clamp is a U-bolt with a saddle and 2 nuts. A wire rope clamp is used for clamping down on 2 strands of wire rope to securely form a loop. They range in all different sizes. For this application a 3/16″ clamp is best. To assemble, insert the end of wire rope into clip saddle loop back around and set the end inside the saddle under the U-Bolt and tighten nuts until secure.

Previously using cable swages which permanently crimp to the cable and are only removed by cutting off. This made any sort of maintenance impossible without cutting the cable. Previously I was able to remove the swages using a Dremel tool precisely not to cut into the wire rope. This took time and was not ideal.

The new clamps pictured are stainless steel and should last much longer in the saltwater environment. The steel rope clamps are pretty inexpensive at around $1.50 to $2.00 apiece but can be purchased in bulk cheaper.

Page 4 of 12« First...2345610...Last »
%d bloggers like this: