
Video – Torqeedo Ultralight 403 Modifications Summarized
Everything mentioned within this video is outlined on The Plastic Hull within the Torqeedo Ultralight 403 Archives.
Check below for links to products used within these mods.


The intent of this parallel portable power pack is for primitive camping areas. Having the ability to charge devices, power LED lighting and even run a small 12V fan in your tent can keep you very comfortable!


Using an Ammo Crate I purchased from Amazon.com the portable power battery pack can be expanded to run from a total of one to three batteries this size. Using the box creates a water resistant seal for all the electronics. Also adding a latching switch along with a 12V receptacle, USB charging port, and a volt meter.


The combination of the 3 can be purchased on Amazon.com.
The ammo crate is not water proof but water resistant. It does however have a gasket in the lid. The primary use of this battery box is for charging things such as phones and other electronics while camping. It will also be set up for Running a 12V oscillating fan on hot tent nights.
For a kayak battery box with parallel batteries I would recommend a smaller box first of all and the PVC style LFP battery packs.
Remove the USB, Volt Meter, and the Cigarette lighter receptacle from the plate. Locate where you would like to mount it. Remember the receptacles will protrude inside the box 3″ also require room for spade connectors to wire them. So install where there be about 4″ if rear clearance. Score a center line for each hole to be drilled. Using a hole saw drill out the 3 holes. Reinsert the accessories into the plate. Recess them into the box. Silicone the plate (optional) then drill 4 holes for the corner screws.
Wire each accessory to the positive and negative sides. Wire int he switch and your battery box is complete.
Want to extend the run time of your kayak electronics for longer fishing trips or tournaments? This article focuses on How To Connect 12V Batteries in Parallel. This can be easily acquired with the addition of a second SLA or LFP battery (LiFePO4) wired parallel. The second battery will need to be the same voltage as the first or they will work against each other which may result in heat issues or decreased run time. Also if you are using a SLA you must use the same type of battery in parallel due to the voltage issue.
You can create a parallel connection between 2 batteries with a few materials simply right at home.

 Most small 12v batteries have male spade connectors on the top as battery terminals. Although some have other connectors its best to match them so you may disconnect the battery from the harness. Since the battery harness will be used in a wet marine environment its best to use marine grade heat shrink connectors.
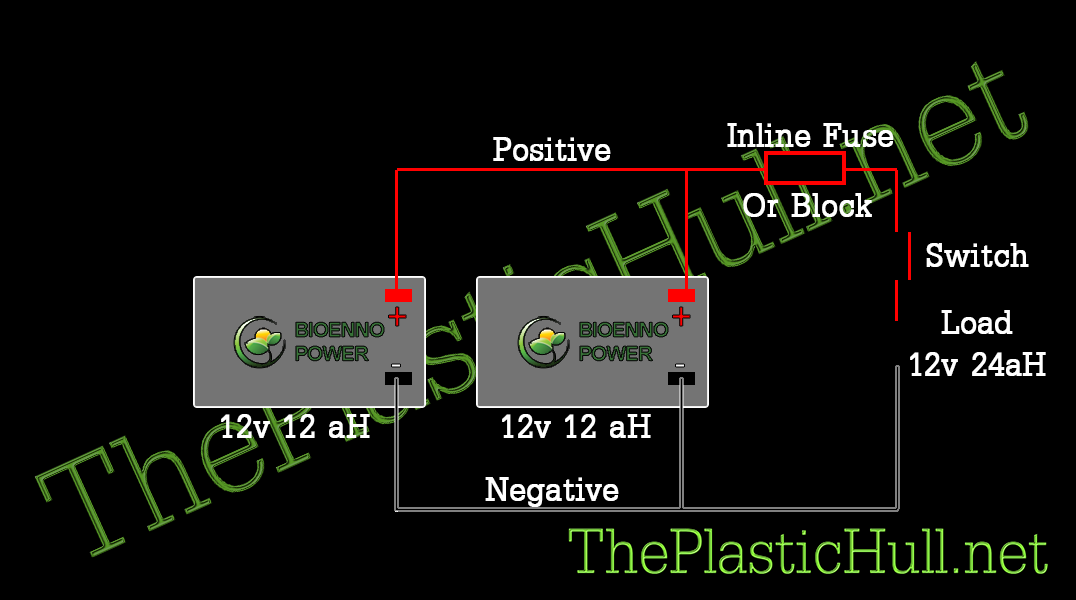
The parallel harness will simply connect two batteries together on the same polarity. Positive to Positive and Negative to Negative. Seen in the diagram on the left, you will to wire in an inline fuse or fuse block on the positive side. Then adding a latching switch adds safety while plugging and unplugging devices around water.
If using an inline fuse the switch can be spliced in after. If using a fuse block a switch can be added before the block as a master switch. Also you may want a switch to control power to every accessory. In that case switch all positive leads from the fuse block. This comes in handy when running say lighting and a fish finder. Separate switches will operate each electrical device.
My Parallel Battery Project includes (2) 12V 12 aH LFP (LiFePO4) batteries. When completed total output will be 12V 24aH. This will extend the run time of the battery but will still power the same electronics.
For building the battery box check out my post: Portable Water Resistant Enclosure & Switching